
Educational Toy Idea Generator
Create Your Custom Toy
Answer these questions to get a simple, effective educational toy idea for your child.
Most parents buy educational toys thinking they’re helping their child learn-but too many of them just sit on the shelf collecting dust. Why? Because real learning doesn’t come from flashy lights or pre-recorded voices. It comes from hands-on exploration, problem-solving, and curiosity. The best educational toys aren’t bought. They’re made. And you don’t need a degree in child psychology or a workshop full of tools to build one.
Start with what your child already loves
Before you grab glue or wood scraps, watch your child play. What grabs their attention? Do they stack cups endlessly? Do they line up cars in perfect rows? Do they spend 20 minutes turning a cardboard tube into a telescope? Those are your clues. Educational toys work best when they connect to a child’s natural interests.
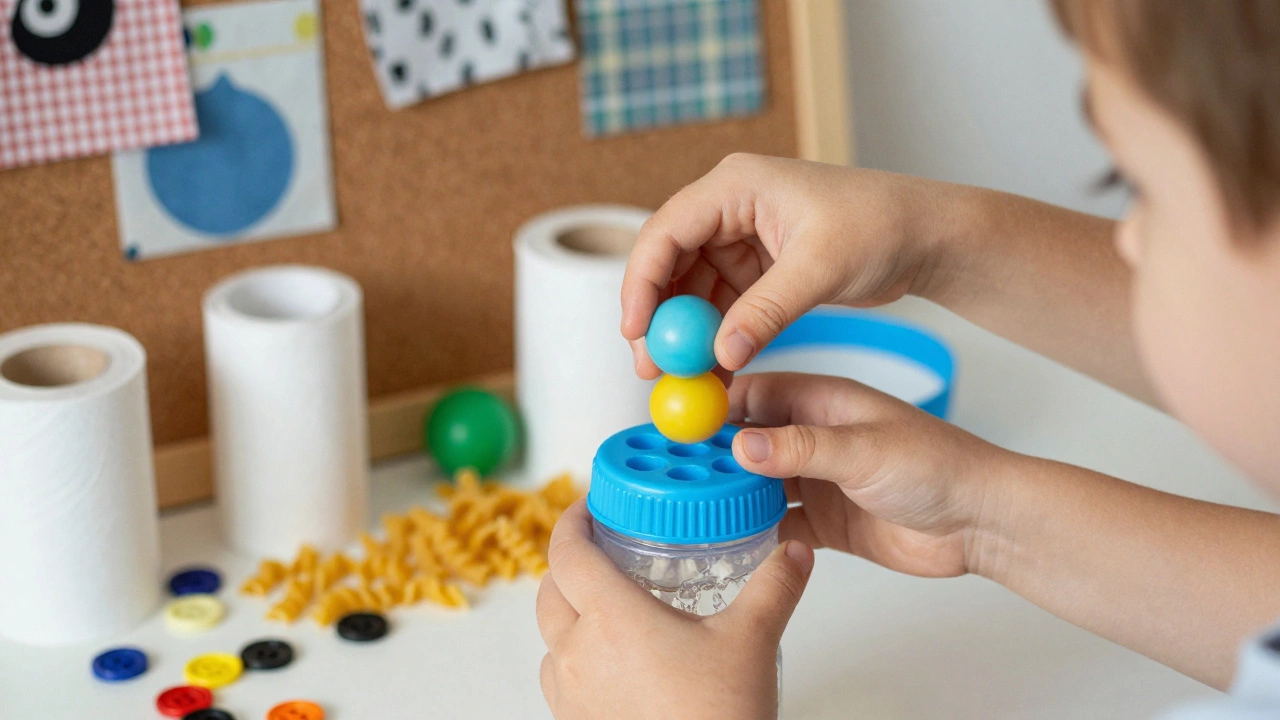
For example, if your toddler loves pouring water, turn a plastic bottle into a sensory sorter. Cut holes in the cap-big, medium, small-and give them different-sized balls to drop through. They’re not just playing. They’re learning size discrimination, hand-eye coordination, and cause and effect. No batteries needed.
Don’t force a theme. If your child isn’t into letters yet, don’t make an alphabet puzzle. Make a texture board instead. Sew on fabric swatches-fuzzy, bumpy, smooth-and attach them to a piece of corkboard. Let them touch, rub, and describe what they feel. That’s language development disguised as play.
Use materials you already have
You don’t need to buy special kits. Look around your house. Cardboard boxes, empty toilet paper rolls, old socks, buttons, bottle caps, yarn, and even dried pasta can become powerful learning tools.
Take a shoebox. Cut a hole in the top. Fill it with different objects: a wooden spoon, a rubber duck, a key, a spoon, a small toy car. Let your child reach in without looking and guess what’s inside by touch alone. This builds tactile recognition and vocabulary. Add a mirror inside so they can see their own face while they guess-suddenly it’s also self-awareness practice.
Old socks? Turn them into puppets. Draw faces with fabric markers. Make them talk. This isn’t just pretend play-it’s emotional expression, narrative building, and social skills in action. One parent in Melbourne made a puppet family from mismatched socks and taught her 3-year-old to name feelings: "This one is sad because he lost his button." Within weeks, the child started naming his own emotions without being asked.
Build for open-ended play
The biggest mistake people make is designing toys with one right answer. A shape sorter with five fixed slots? That’s fine for a few weeks. But a pile of wooden blocks, clay, and string? That’s a year of learning.
Open-ended toys don’t have instructions. They don’t come with a goal. That’s the point. A child builds a tower. It falls. They rebuild it taller. Then they turn it into a bridge. Then a spaceship. Each version teaches physics, balance, creativity, and resilience.
Try this: gather 20 wooden blocks, 10 cardboard tubes, 5 rubber bands, and a few clothespins. Put them in a basket. Let your child do whatever they want. Don’t show them how. Don’t correct them. Just observe. You’ll see patterns emerge-how they solve problems, what they try again, what they abandon. That’s your data. Use it to build the next toy.
Focus on motor skills, not just brains
Many people think "educational" means reading, math, or letters. But fine motor skills are just as critical. If your child can’t hold a pencil properly, they’ll struggle to write later. If they can’t thread a string, they’ll have trouble tying shoes.
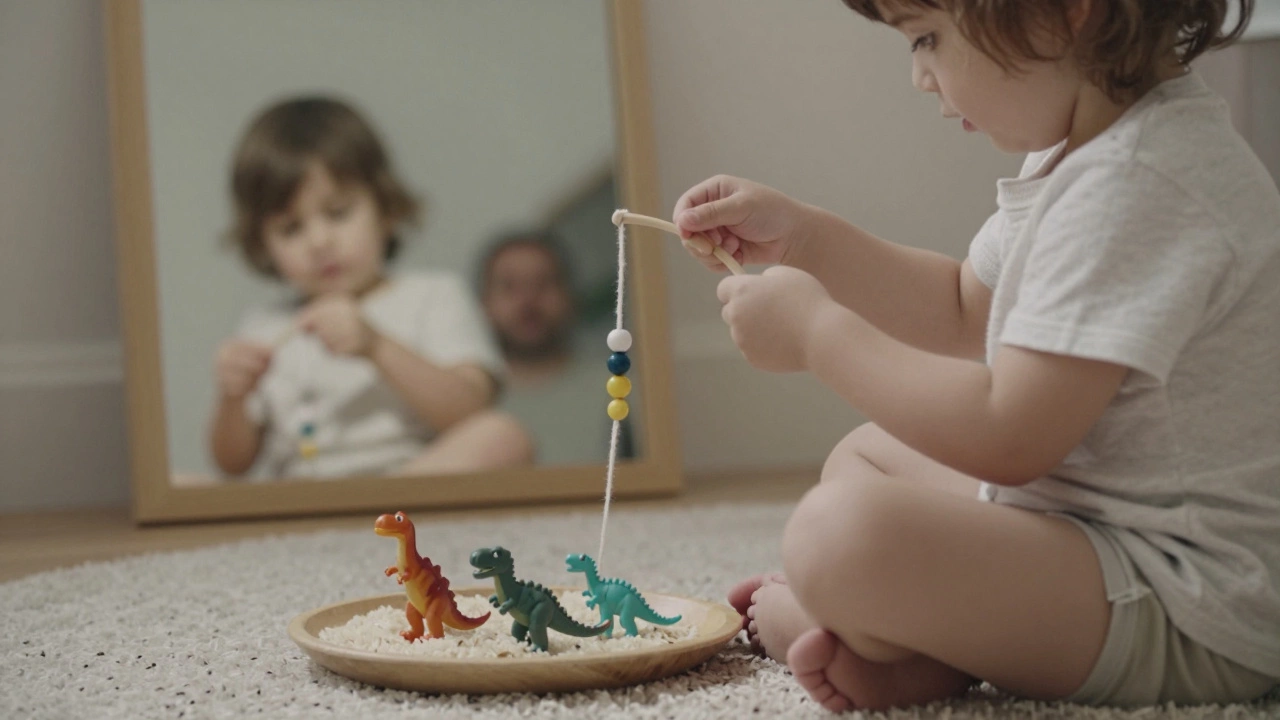
Make a bead threading toy from a wooden hanger. Bend the bottom into a U-shape. Tie a long piece of yarn to the top. Thread large wooden beads or pasta tubes onto it. Let them pull the yarn through, twist it, tie knots. Add a clothespin to the end so they can clip it on and off. This builds finger strength, bilateral coordination, and patience.
Another idea: fill a shallow tray with rice or dried beans. Bury small objects-a plastic dinosaur, a button, a coin. Give them a spoon or small brush. Let them dig. This is sensory input mixed with precision movement. It’s also calming. Many occupational therapists use this exact method for kids with attention difficulties.
Test it before you call it done
Don’t assume your toy works just because it looks clever. Watch your child interact with it for at least 15 minutes. Do they get bored? Do they repeat the same action over and over? Do they try to break it? Do they invite someone else to play?
Here’s what to look for:
- Repetition = they’re mastering a skill
- Modification = they’re adapting it creatively
- Collaboration = they’re using it socially
- Frustration = it’s too hard or too easy
If they lose interest quickly, don’t toss it. Tweak it. Add a new piece. Change the texture. Make it taller, wider, louder, quieter. Learning toys evolve. So should your design.
Keep it safe and simple
Small parts are a choking hazard for kids under three. Avoid buttons, beads, or anything smaller than a toilet paper tube. Use non-toxic glue. Sand wood edges smooth. Wash fabric pieces before use.
Also, skip the complexity. A toy with 15 buttons and three sound chips isn’t educational-it’s distracting. The best educational toys are simple. They have one clear purpose. They invite curiosity, not confusion.
Think of it like this: a child’s attention span is short. Their curiosity is endless. Your job isn’t to entertain them. It’s to give them a tool that sparks their own thinking.
Examples you can start today
Here are three real, low-cost ideas that work:
- Color Matching Box: Take a shoebox. Paint the inside bottom in three colors. Cut three holes on top, each matching a color. Give your child three colored balls. They drop them in. You can add numbers or shapes to the balls for extra challenge.
- Sound Shakers: Fill three empty plastic bottles with different materials-one with rice, one with beans, one with pennies. Seal the caps with hot glue. Let your child shake them and guess what’s inside. Then sort them by sound: loud, medium, quiet.
- Pattern Bracelets: Use large plastic beads and thick elastic cord. Make a simple ABAB pattern (red-blue-red-blue). Let your child copy it. Then let them make their own. This teaches sequencing, a foundational math skill.
These aren’t fancy. But they’ve been used in preschools in Melbourne, Sydney, and even rural towns in Tasmania. They’re cheap. They’re safe. And they actually teach.
Why homemade beats store-bought
Store-bought educational toys often cost $40-$80. Many are made of plastic, come with pre-set sounds, and lock kids into one way of playing. They’re designed for marketing, not development.
Homemade toys? They’re tailored. They change as your child grows. They carry your voice, your time, your attention. That’s the real secret. The toy isn’t what teaches. It’s the interaction around it.
When you sit with your child and say, "What do you think will happen if we drop this here?"-that’s learning. When you let them try again after it falls, that’s resilience. When they show you their creation and you say, "Tell me about it," that’s confidence.
You don’t need to be an artist. You don’t need to be an expert. You just need to be present. And willing to get messy.
What age can kids start with homemade educational toys?
Kids can start as early as 6 months with simple sensory toys-textured cloths, soft rattles made from socks and beans, or a wooden spoon to bang on a pot. By 12 months, they can handle threading, stacking, and shape sorting. The key isn’t age-it’s safety and developmental readiness. Always match the toy to their motor skills and interests, not a label on a box.
Do educational toys really make a difference?
Yes-but only if they’re used right. A 2023 study from the University of Melbourne tracked 120 toddlers who played with homemade vs. store-bought toys daily for six months. Those with homemade, open-ended toys showed 30% higher scores in problem-solving and language use. Why? Because they were engaged longer, invented more uses, and had more back-and-forth conversations with caregivers. The toy itself isn’t magic. The interaction is.
How long should a child play with one toy before moving on?
There’s no set time. Some toys last a week. Others last a year. Watch your child. If they’re still discovering new ways to use it-keep it. If they’ve mastered it and moved on, store it and bring it back in a few months. Kids often return to old toys with new skills. A simple block tower at 18 months becomes a bridge at 24 months, then a castle at 30 months.
Can I make educational toys without spending money?
Absolutely. Most of the best educational toys cost nothing. Cardboard boxes, empty jars, old clothes, and kitchen utensils are all you need. The real cost is your time. But that’s the best investment you can make. A child who plays with a homemade toy made by a parent remembers the feeling of being seen-not just the toy.
What if my child breaks the toy?
Good. That means they’re exploring. If a toy breaks, use it as a learning moment. "Hmm, the glue came off. Why do you think that happened?" Then fix it together. Or rebuild it differently. Breaking isn’t failure-it’s data. Kids learn from messes, not perfect results.
Next steps: Start small, stay consistent
Don’t try to make five toys this weekend. Pick one. Use one thing you have at home. Make it tonight. Let your child play with it tomorrow morning. Watch. Listen. Adjust. That’s all it takes.
Education doesn’t live in expensive gadgets. It lives in the quiet moments-when a child’s eyes light up because they figured something out on their own. Your job isn’t to teach them everything. It’s to give them the tools to discover it themselves.